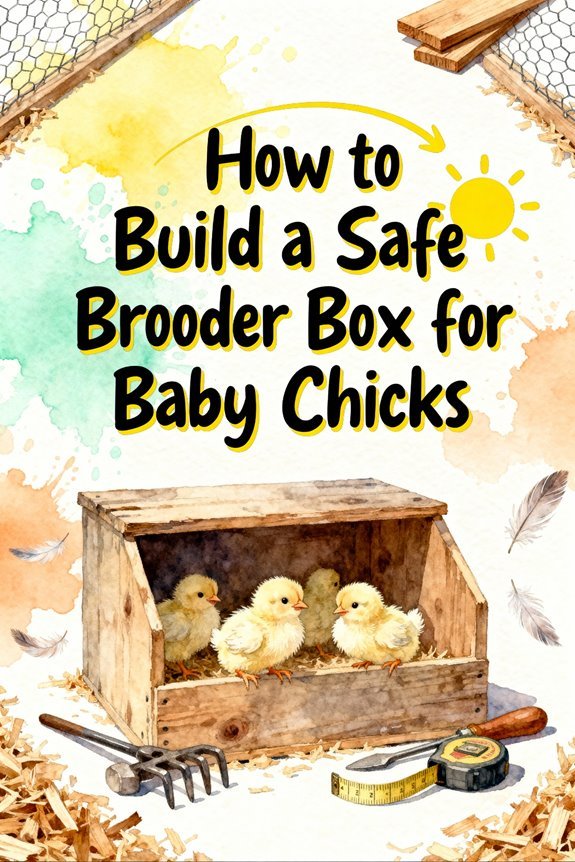
To build a safe brooder box for baby chicks, you’ll need a sturdy container like a plastic tote or cardboard box lined with waterproof material. Start with 6 square inches per chick, using non-toxic bedding like shredded paper or aspen shavings. Install a secure heat lamp to maintain 95°F, reducing by 5°F weekly. Add proper ventilation, feeders, and waterers, and guarantee walls are 2-3 feet high to prevent escapes. Understanding these basics will help you create the perfect environment for your growing flock.
Essential Materials and Supplies for Your DIY Brooder Box
Five essential supply categories form the foundation of a successful brooder box: appropriate bedding, a suitable container, reliable heat source, feeding equipment, and maintenance materials.
Start with bedding types like shredded paper, aspen shavings, or chopped straw – you’ll want options that keep chicks comfortable while encouraging natural behaviors. Shredded paper makes an excellent choice as it is essentially dust-free and highly absorbent. Choose a container that’s easy to clean and modify, such as a cardboard box or plastic tote, and line it with waterproof material. Install safe heat sources like an infrared radiant heater, positioned securely above your chicks. Add properly sized food and water containers that won’t tip over, along with roosting bars and a sheltered corner for rest. Keep cleaning supplies, temperature gauges, and fresh bedding readily available for daily maintenance and ideal brooder conditions.

Safe Radiant Heat – No Fire Risk: Designed as a safer alternative to traditional heat lamps. This chicken coop heater uses enclosed far-infrared thin-film heating technology to provide steady warmth without open bulbs, exposed elements, or fire hazards -ideal for unattended overnight use.
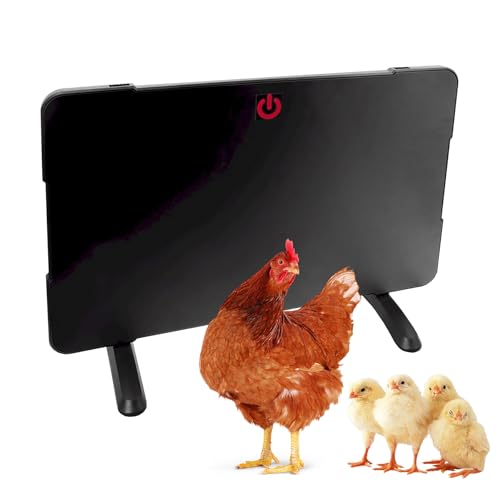
CONVERTIBLE 2-IN-1 DESIGN: For use as either a 200W chicken coop heater or a 50W horizontal brooder heater for baby chicks, this radiant panel heater provides consistent warmth

WATER RESISTANCE IPX5 - Indoor and outdoor rated heater, IP55. Instantly warm up the area with clean and odorless infrared heat, ideal for greenhouse heating, shed, store room, garage, milk house, grow tent.
Space Planning and Sizing Requirements for Baby Chicks
Space planning stands as one of the most critical factors in building a successful brooder box for your chicks. You’ll need to carefully consider brooder dimensions based on your flock size and their growth stages. Start with 6 square inches per chick during their first 4 weeks, then increase to 1 square foot per bird from weeks 4-8. Watching these playful baby chicks explore their brooder space can provide endless entertainment and joy.
When determining space allocation, factor in room for feeders, waterers, and heat sources. Build your brooder walls about 2 feet high to prevent escapes and allow for practice roosts. Using strong, durable materials will ensure your brooder can withstand active chicks and frequent cleaning. For a flock of 20 chicks, aim for a brooder that’s roughly 3 feet by 2 feet during early stages. Remember to design your brooder so you can expand the space as your chicks grow – they’ll need about 2 square feet each by weeks 8-12.
Setting Up a Secure and Safe Brooding Environment
After determining the right size for your brooder, your next priority is creating a secure environment that keeps chicks safe from predators and hazards. Start by selecting sturdy materials like galvanized metal or wood, and guarantee the walls are at least 3 feet high to prevent escapes. For maximum brooder security, install hardware cloth on wooden walls and add a secure chicken wire lid. A puppy playpen design offers an excellent alternative to traditional brooder structures.
Position your brooder in a monitored location away from drafts and direct sunlight. You’ll need to protect against both outdoor and indoor predators, including household pets. Install secure latches on doors and guarantee all electrical components, especially heat lamps, are safely mounted. Don’t forget to maintain proper ventilation while keeping the structure stable and predator-proof. Regular cleaning and daily monitoring will help prevent health issues.

Upgrade Rust-proof and durable steel structure: The chicken coop adopts high-quality steel pipe frame and galvanized technology, so there is no need to worry about rust outdoors. The steel pipe has a diameter of 1 inch, The portable chicken cage has an upgrade reinforced design, which steel pipe diameter is thicker than most sold in the market, which is strong and stable enough in windy and heavy rain

COMPACT HEAVY DUTY DESIGN: This 63 inch metal chicken coop offers a practical mid-size footprint for backyard poultry keeping, small animal housing, and home breeding while still providing roomy enclosure space for daily movement.

THERMAL ENERGY:50w Light Bulb 3s Speed Heating, Rotating The Stepless Knob To Adjust The Light To Achieve Different Temperature Levels In The Brooding Box At Different Stages, With A Maximum Temperature of 130 ℉, As Warm As Summer Sunshine And A Hen'S Embrace.
Temperature Control and Proper Ventilation Systems
Because temperature control is crucial for chick survival, you’ll need to start your brooder at 95°F and decrease it by 5°F each week until reaching room temperature. Install a heat lamp on an adjustable mount and position it to create distinct warm and cool zones, allowing chicks to regulate their body heat naturally. Providing half a square foot per chick prevents overcrowding and ensures proper temperature regulation.
Monitor your brooder’s temperature using a reliable thermometer and watch for behavioral indicators. If chicks huddle together under the lamp, they’re cold; if they scatter to the edges, they’re too hot. Similar to nesting box design, proper ventilation requires careful consideration of space and comfort. Guarantee proper ventilation by incorporating mesh panels or small vents while avoiding drafts. Position vents above chick level to prevent direct airflow. Your ventilation system should maintain fresh air circulation without compromising the heat needed for healthy chick development. When selecting heating equipment, avoid placing rodent control products near the brooder area, as even small amounts can be lethal to developing chicks.
Introducing our Compact Clamp Fixture: Crafted from high-quality, coated metal, this fixture boasts a strong grip, ensuring firm support for a variety of reptile deep dome lamps.
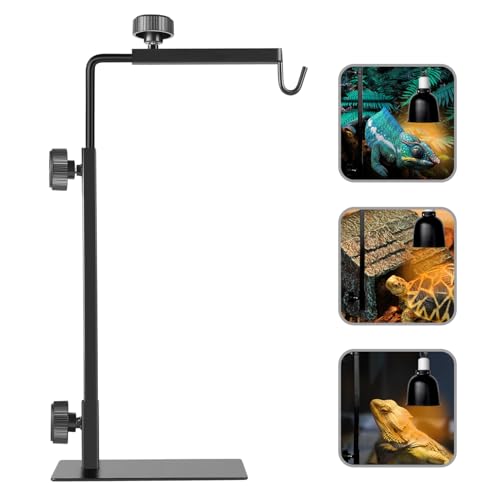
【Sturdy & High Load-Bearing】 The reptile lamp stand is made of all-metal structure and is durable. You can easily install the heating lamps and lighting equipment on the top of the glass container, and adjust the height and position freely. The high load-bearing can hang double lampshades or even 3 lampshades.

VERSATILE APPLICATION: This product is designed to perfectly fit reptile terrariums ranging in height from 15.7 to 31 inches, making it suitable for a wide range of reptiles and amphibians. From hermit crabs to bearded dragons, turtles to geckos, lizards to frogs, crickets to spiders, and more, it caters to various species.
Daily Maintenance and Cleaning Procedures
Maintaining a clean brooder environment requires daily attention to several key tasks that directly impact chick health. You’ll need to implement a strict cleaning schedule that includes checking feeders and waterers twice daily, removing spills and replenishing supplies as needed. Spot clean droppings and wet bedding throughout the day to prevent ammonia buildup. Using products like Vetsense COOP Clean ensures proper sanitization of the brooder environment.
Your sanitation techniques should focus on thorough cleaning of all equipment. Scrub waterers if you notice algae formation, and sanitize feeders regularly to prevent contamination. Replace soiled bedding promptly, using pine shavings rather than newspaper to prevent leg injuries. Don’t forget to maintain enrichment items and perches weekly. Remember to practice proper biosecurity by washing your hands before and after handling chicks, and keep the brooder isolated from mature birds to prevent disease transmission. Using non-GMO feed can help ensure optimal chick health and development from the start.
Smart Design Features for Long-Term Success
When designing a brooder box for long-term success, you’ll need to incorporate several key features that maximize efficiency and durability. Start with a sturdy frame made of stainless steel or plywood, then add design flexibility through modular components that can expand as your chicks grow. A well-designed setup can comfortably house 50 to 100 chicks depending on the dimensions you choose. Placing the brooder in a location protected from cold northwest winds will help maintain optimal temperatures naturally. Chicks with curly feathers require extra attention to temperature control due to their altered feather structure.
Install clear observation windows and secure latches for easy monitoring and predator protection. You’ll achieve significant cost savings by incorporating recycled materials where appropriate, but don’t compromise on essential elements like proper insulation and ventilation. Create distinct temperature zones using an adjustable hover system, and guarantee your design includes removable panels for easy cleaning. Position food and water dispensers strategically to prevent waste and maintain cleanliness. Remember to include adequate lighting while keeping all electrical components safely secured and properly maintained.