You’re staring at fifty chirping chicks, wondering if your setup will become a cramped, stressful mess. Don’t sweat it; you actually need exactly 25 square feet right now, giving each bird half a square foot. Obviously, that space fills up fast, so plan to double your floor area before they hit four weeks. Heavy breeds might need even more room to avoid trouble. If you stick around, you’ll see exactly how to expand that space without breaking a sweat.
Calculate Exact Brooder Size for 50 Chicks
Look, you’re probably staring at a stack of lumber or a plastic tub wondering if you’ve grabbed enough room for fifty little peeping machines without turning your garage into a feathered sardine can. You need exactly twenty-five square feet initially, so a circular draft shield five feet across works perfectly. Don’t forget that feeders eat up floor space, so add extra room immediately. Obviously, cramming them tight ruins draftant health and invites pecking disasters. Now, sketch your lighting plans carefully because heat lamps demand specific clearances to prevent fires while keeping toes warm. Walls must stand two feet high before those jumpers escape. All right, you could squeeze them tighter for day one, but why risk it? Just build the full twenty-five square feet now. This approach saves you frantic midnight expansions later. Grab that tape measure and cut your wood; you’ve got this sorted. Remember that half a square foot per bird is the baseline measurement to ensure they stay warm and find resources easily.
Determine Initial Space Requirements Per Bird
Since you’re already sweating the math on how much room fifty chirping troublemakers actually need, let’s cut through the conflicting charts before you buy the wrong lumber. You need exactly half a square foot per chick for those first four weeks. That’s twenty-five square feet total, minimum. Ignore anyone suggesting six square inches; that’s tight packing, not humane raising. You’re aiming for solid welfare standards, not a sardine can. Overcrowding spikes stress and invites pecking disasters fast. Obviously, heavy breeds demand more room immediately, so adjust accordingly if you’re raising giants. Feeding density matters immensely because blocked access stunts growth instantly. Guarantee waterers and feeders sit freely without cramping their tiny dance floors. Don’t gamble with cramped quarters now. Give them space to breathe, move, and thrive from day one. Your future flock depends on this smart start today.
Expand Floor Area as Chicks Reach Four Weeks
By the time those feathers start popping, your twenty-five square feet will feel like a crowded elevator, and you’ll see the stress kicking in before you can say “pecking order.” Now, don’t panic, but you’ve got to double that space fast because your fifty troublemakers need at least 37.5 to 50 square feet once they hit the four-week mark. They’re stretching wings and running laps, so cramming them invites pecking disasters. You must prioritize their heat health by ensuring warm zones don’t become sweatboxes while cooler areas stay draft-free. Good ventilation becomes critical now; stale air breeds sickness faster than you can clean bedding. Raise those walls to three feet since fledglings test flight limits daily. Obviously, you’ll need deeper litter for all that extra activity. Don’t let cramped conditions stall growth rates when simple expansion fixes everything. Just give them room to breathe, move, and thrive without overcrowding stress ruining your hard work. It’s the smart move for healthy birds.

[ Dual & Independent Heating System for Ultimate Safety ] - Features 2Packs 25W lamps with separate controls, allowing flexible adjustment from 0W to 50W. This design ensures even, stable heating and prevents the concentrated high heat that can scorch wood or harm pets—a common risk in single-bulb 50W setups. The embedded thermometer provides easy, accurate monitoring for precise temperature control ( 90-120˚F/ 32-49°C ).

5 in 1 Chick Starter Kit: Included brooder box playpen, playpen pad, chick feeder*2, chick waterer. As your chicks grow stronger and feather out, easily transition it into a safe outdoor playpen.
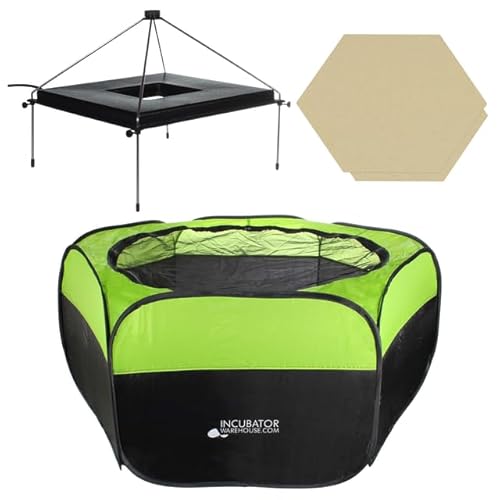
𝐄𝐍𝐂𝐋𝐎𝐒𝐀𝐁𝐋𝐄 𝐃𝐄𝐒𝐈𝐆𝐍 𝐖𝐈𝐓𝐇 𝐌𝐄𝐒𝐇 𝐓𝐎𝐏: The fully enclosable design of the chicken pen ensures that your birds remain safe and secure as they grow, preventing any risk of escape. The removable mesh top allows for easy access for feeding, cleaning, and monitoring the chicks and the transparent mesh ensures visibility.
Select Optimal Brooder Dimensions and Shape
Although you’ve got the space figured out, staring at a sea of brooder shapes and sizes probably feels like trying to pick a wedding venue for fifty rowdy toddlers. You need 0.5 square feet per chick initially, so a 2×2-foot box or 6-foot circular guard works perfectly. Don’t let brooder aesthetics fool you; circular designs actually concentrate heat better for newborns, while rectangular ones offer easier cleaning later. Chick health depends entirely on avoiding crowding, which triggers pecking and stress immediately. Obviously, you must place feeders in a spoke pattern and keep waterers separate to prevent messy contamination. If you choose a rectangular layout, guarantee you have sliding poop boards for sanitation. Circular guards make expanding space as they grow much simpler than moving walls. Pick the shape that fits your cleaning style, because clean chicks are happy chicks. Now, go grab that six-foot ring and start building.

Holds up to 15 chicks — ideal size for backyard flocks & homesteads — The YAKCAM chick brooder corral forms a spacious 39" diameter, 17" tall circular enclosure — ample room for up to 15 chicks or ducklings to move freely, stay warm under a heat lamp or brooder plate, and grow comfortably during those critical first weeks. Whether you're raising your first batch of backyard chicks or you're a seasoned homesteader, this is the brooder setup that gets it right.

🐥 All-in-One Chicken Brooder Kit - Magicfly brooder box includes pen*1, brooder heating plate*1, chicken feeder&waterer*1, top cover*1, chicken perch*1, waterproof floor pad*1, peg*3, storage bag*1. Designed to support chicks during early growth stages, creating a warm and contained space that is also suitable for ducklings, small rabbits, and puppies in short-term housing scenarios.
Set Weekly Temperature Reduction Schedules
You’ve got the perfect brooder ring set up, but now you’re staring at that heat lamp wondering if you’re cooking your future flock or freezing them solid. Don’t panic. Start week one at 95°F, then drop that weekly temperature by exactly 5°F. Watch chick behavior closely; if they huddle or shiver, pause the reduction immediately. Some folks keep week two warmer if birds seem sensitive, and that’s totally fine. By week five, you’ll hit 75°F as feathers fill out. Obviously, every flock differs, so flexibility prevents stress while promoting growth. Once they hit week six at 70°F, they’re basically self-regulating little furnaces. Trust your eyes over rigid charts. If they’re spread out and eating, you’re nailing it. Adjusting heat isn’t rocket science, just careful observation. Get this rhythm down, and your chicks will thrive without breaking a sweat. Remember that maintaining an optimal temperature range keeps chickens comfortable without excess energy use once they transition from the brooder.
Arrange Feeders to Maximize Usable Floor Space
Since you’ve already wrestled with heat lamps, don’t let a cluttered floor trip up your flock now. You need three to five medium feeders, giving every bird those essential three inches of space. Forget bucket feeders; they cause discomfort and fierce competition you don’t want. Instead, master feeder ergonomics by suspending units on chains or raising them on platforms. This keeps the central floor clear for movement while allowing easy cleanup underneath. Position these along the comfort zone’s edge, moving them outward as your chicks grow. Adjust heights to match their backs, which dramatically aids waste reduction by stopping contamination and scattering. Use grilles to block claw raking and lips to contain pulled feed. Obviously, starting with shallow pans helps, but switch quickly. By keeping equipment peripheral, you maximize usable space and encourage healthy exercise without crowding. Clean feeders regularly to prevent disease spread and ensure hygiene remains optimal for your growing flock.

ATTRACT NATURE; This bird feeder tray from My Favorite Chicken is the ideal solution for nature lovers who want to attract more wildlife to their yard; With plenty of room to perch, it makes an excellent finch feeder or cardinal bird feeder; It even serves as a squirrel feeder for outside use or a woodpecker feeder

ANTI-ROOSTING REEL - The feeder features a free-spinning reel which discourages roosting on the feeder by making it tough for them to roost on it.

LARGE 30 LB CAPACITY:Holds up to 30 pounds of feed—perfect for flocks of all sizes. Reduce refill frequency and keep your chickens happy and full.
Install Chick Guards to Prevent Escape and Drafts
You’ve cleared the floor for feeding, but let’s be honest: a wandering chick in a drafty corner is a dead chick, and nobody wants that funeral on their hands. You need a solid barrier now. Grab some corrugated cardboard or hard plastic; your choice of guard material dictates how well you block those chilling breezes. Form a six-foot circle around your heat source to keep fifty chicks safe and warm. This setup guarantees proper airflow control while stopping drafts dead in their tracks. Obviously, slick sides prevent escapes, and round shapes stop deadly piling. Move the guard out daily as they grow stronger, then remove it completely after one week. Don’t guess with their lives; build this simple wall today. It’s the easiest insurance policy you’ll ever buy for your flock’s survival. Construct a barrier using old sacks or any available material, forming a round or oval shape to prevent crowding in corners.

【Complete 2-Pack Set for Flock Care】 Includes two hen saddles: one with an adorable orange chick pattern and one with a classic white rooster design. Rotate between them or outfit two hens at once—perfect for small backyards or multi‑hen coops.

Material and size: The size of the black hardware cloth is 48 inch×100 ft square and 1 inch×1 inch thickness, black vinyl coated.

Material and size: The size of the hardware cloth is 48 inch×100 ft square and 1 inch×1 inch thickness, adopt hot-dipped galvanized material
Transition Birds to Free-Range Space Standards
Now that your chicks are surviving the brooder, you’re probably staring at your backyard wondering how much room they actually need before you commit to building a massive coop. Here’s the thing: standards vary wildly depending on your goals. If you chase Certification guidelines, Certified Humane Pasture-Raised demands a whopping 108 square feet per hen, while basic USDA Free-Range offers no specific number. Obviously, that difference changes everything. You’ll want pasture rotation to keep vegetation alive and mud at bay, especially since smaller runs turn into exercise yards quickly. Indoor space shrinks to 2–4 square feet if they roam outside daily. Don’t let vague rules confuse you; pick a standard fitting your land size. Whether you choose two square feet or over a hundred, planning now prevents crowded chaos later. Make that smart choice today.