You’ll build a gravity-fed PVC feeder that cuts your feed costs by 30% and halves daily chore time. This no-electricity design uses strategically drilled ports to control feed flow and minimize waste. You can construct versions from PVC pipe, 5-gallon buckets, or large totes, positioning the feed window 100-150mm above floor level. The enclosed hopper deters rodents while maintaining feed quality. Uncover how proper height adjustment and sealed seams maximize your flock’s health and efficiency.
The Simple PVC Pipe Design
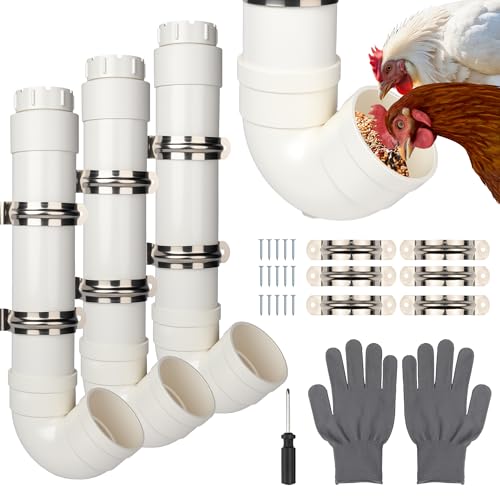
Building a PVC chicken feeder doesn’t require specialized skills or extensive materials—you’ll need a 3-inch PVC pipe, a 45-degree Y connector, PVC cement, primer, caps, and basic hand tools. You’ll cut your main hopper pipe to 26-27 inches, then attach a 6-inch pipe to one Y connector end for ideal chicken reach height. The 3-inch pipe connects to the angled arm, delivering feed at your birds’ preferred angle. PVC advantages include durability, weather resistance, and cost-effectiveness compared to metal alternatives. This design maximizes feeder efficiency by minimizing waste while ensuring consistent feed delivery. Keeping feeder caps on protects against moisture and pests that could compromise your feed supply, ensuring your chickens receive a balanced diet necessary for optimal growth and egg production. Additionally, a well-designed feeder can complement automatic waterers to further enhance your flock’s care. It’s important to ensure that the feed provided in the feeder is age-appropriate feed, as this supports the chickens’ health and growth. Before cementing joints permanently, fit components together without adhesive, allowing adjustments. Once you’re satisfied with alignment, apply primer and cement for secure, lasting bonds. Moreover, chicks utilize a temporary umbilical cord connected to their yolk sac before hatching, which is essential for their early nourishment.

Easy install, come with a 3.15"/80mm hole saw, make an outdoor chicken feeder in a minute

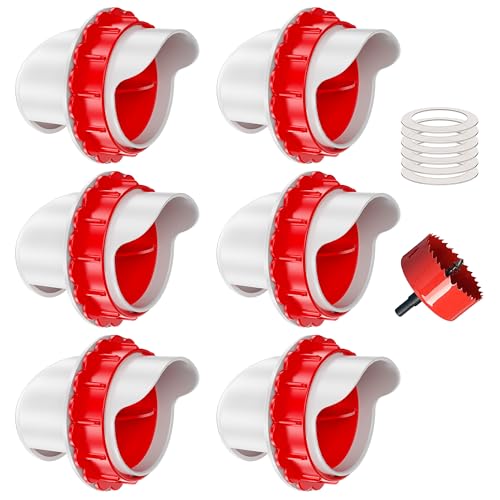
SIMPLE EASY 5-MINUTE INSTALLATION: This diy chicken feeder kit is designed for an efficient, straightforward setup with no experience needed. Drill a 3-inch hole into your container, insert the chicken feeder port, and tighten with the included bushing and waterproof seal. This listing includes 1 single feeder port only.

NO MORE FEED SCATTERED ON THE GROUND: This chicken feeder uses a gravity-fed port design to deliver chicken feed directly to your flock, keeping it inside the feeder, off the ground, and away from pests. The enclosed port design reduces spillage and wasted feed, making it an ideal chicken feeder option for backyard chickens.
How the No-Spill Mechanism Works
While your PVC feeder’s structure contains the feed, its no-spill mechanism‘s effectiveness hinges on controlling how that feed’s delivered to your birds.
You’ll rely on gravity flow through strategically sized ports to meter access. Drilled holes—typically sized to match your feed’s particle diameter—limit how much feed escapes per peck, preventing volume ejection. You’re restricting feed visibility by keeping the bulk supply isolated within the hopper; only the port’s lower edge presents feed to your chickens.
This design exploits your birds’ natural pecking behavior without triggering aggressive head-thrashing that scatters grain outward. The narrow opening forces controlled, downward pecking rather than lateral wing-fling. Your port orientation—angled or offset—further blocks lateral shove, channeling feed directly downward into your tray rather than across it. Unlike modern feeders with WiFi-connected monitoring, this mechanical approach relies entirely on passive physics to contain waste without batteries or technology.

【Premium & Durable PVC Material】This pvc chicken feeder is constructed from high-quality PVC with a wall thickness of approximately 0.2 inches, ensuring excellent sturdiness and wear resistance. Easy to wipe clean, and effectively keeps the feed dry and fresh.
Waste Free Pvc Chicken Feeder: The wall-mounted chicken feeder, rat-proof chicken feeder, enables continuous feeding for chickens, minimizing feed waste and reducing rearing costs. Please note: This PVC chicken feeder is 19.3 inches long, 6.7 inches wide, and has an inner tube diameter of 3.8 inches.

[NO-WASTE DESIGN]: The feeder inlet extends downwards by 0.8 inches, which helps prevent uneaten feed from spilling out, effectively reducing feed waste and mess, keeping the chicken house clean, and thus saving you cleaning time and feed costs.
Building a 5-Gallon Bucket Feeder
Now that you understand how controlled ports manage feed delivery, you’ll apply that same principle to construct a practical 5-gallon bucket feeder—a cost-effective design that achieves the no-spill mechanism through strategically drilled holes and a pan catch system.
Start by drilling 1-2 inch holes around the bottom edge of your DIY bucket, spacing them 2-3 inches apart for even distribution. Use a standard paddle bit to prevent oversized openings that waste feed. This method of controlled feed access is similar to how chicken treats can be distributed to encourage natural foraging behavior. Additionally, you should ensure that the feed you provide meets the specific needs of different life stages of your chickens for optimal health and productivity. Feeding your chickens a diet rich in essential amino acids can support their overall wellbeing and enhance egg production. Ginger can also be incorporated into their diet to improve digestive health, providing even more benefits. Next, position your drilled bucket into a galvanized or rubber pan, then secure both pieces with a bolt, washer, and nut through aligned center holes. Be sure to ensure proper installation when assembling your feeder components. Fill your chicken feeder with pellets until the pan catches overflow. Finally, attach the lid and elevate the entire assembly on bricks or stumps to chest height for ideal accessibility and functionality. For larger flocks, consider building multiple feeders to ensure all chickens have adequate access to feed without competition.

It takes only a few minutes to build your chicken coop feeder, no matter 3 gal or 5 gallon, any size and shape containers, transform a bucket, box, barrel, or bin into a large chicken feeder

Keep it clean & No Waste: You just place DIY chicken feeders anywhere on your farm or coop, fill it with feed and poultry feeders will be driven by gravity. Feed your chickens in an easy way, prevents spilling of feed and no waste. Chicken feeders can save you 15-33% of feed and make your coop cleaner and more comfortable
Keep it clean & No Waste: You just place DIY chicken feeders anywhere on your farm or coop, fill it with feed and poultry feeders will be driven by gravity. Feed your chickens in an easy way, prevents spilling of feed and no waste. Chicken feeders can save you 15-30% of feed and make your coop cleaner and more comfortable
Creating a Large-Capacity Tote Feeder
A large plastic tote transforms into a high-capacity feeder that’ll sustain your flock for weeks without daily refills. Start with proper tote selection—choose medium or large sizes based on your run space and flock requirements. Drill holes matching your PVC elbow diameter, then insert elbows and seal them with PVC glue inside and outside the tote walls. Mount sufficient access points so half your flock eats simultaneously. Position the tote at chicken chest height using bricks or platforms. Add 3-inch PVC pipe extensions to reduce waste and spillage. For feed maintenance, secure an optional lid to keep pellets dry and protected from contamination. This design uses available scraps to minimize costs while accommodating 50+ pounds of feed, supporting 8+ birds efficiently. This zero-waste design accommodates 50+ pounds of feed, supporting 8+ birds efficiently.

DURABLE MATERIAL: This chicken feeder is made from high quality plastic (Polyethylene), corrosion resistant, discoloration resistant and ageing resistant;

Ample Quantity for Versatile Use: the set includes 6 chicken feeder troughs and 12 reusable nylon zip ties, allowing flexible installation in coops, brooders, or outdoor farms; Each feeding trough comes with straps for easy hanging, adapting to various poultry setups

HANGING POULTRY FEEDER: Harris Farms 10 Pound Plastic Hanging Feeder is simple to fill and clean, with a visible feed level window, heavy-duty carry handle, and easy twist-lock assembly—making it a durable and convenient choice for feeding your flock.
Essential Materials and Tools Needed
Before you begin constructing your DIY chicken feeder, you’ll need to gather specific materials organized into four primary categories: PVC pipe components, PVC fittings and caps, containers and buckets, and wood and lumber materials, along with essential tools and adhesives.
Your materials checklist should include 3-inch diameter PVC pipes in various lengths, 90-degree elbows, 45-degree Y-connectors, and threaded caps. Acquire food-grade buckets ranging from 2.5 to 5-gallon capacity and untreated lumber boards for structural support. The 3-inch long piece added to the Y connector is essential for reducing food spillage in the feeder design.
For tool selection, prioritize a hacksaw for precise PVC cutting, a drill with assorted bits for pilot holes, and PVC cement for permanent assembly. Utility knives, liquid nails, and caulk complete your toolkit. Confirm all materials match 3-inch specifications to guarantee proper fitment and structural integrity throughout construction.

Pipe Insider Connector 3"

HIGH QUALITY - These pipe straps are made from high quality PVC, sturdy and durable, anti-corrosion. The surface is super smooth and burr-free.

PVC rigid pipes hard hardware tubing are mainly in water pipes. The inner wall of PVC pipe is smooth and does not limit the flow of liquid. The hard pipe is suitable for outdoor use and can be used in direct sunlight. The pipes are also widely used in DIY, cable sleeves, etc.
Step-by-Step Assembly Instructions
With your materials gathered and tools at hand, you’re ready to begin construction by marking and cutting the feed ports—the critical first step that determines how efficiently your chickens’ll access food and how well you’ll control feed waste. Measure port positions evenly around your container’s circumference, then pilot-drill before cutting to prevent cracking. Select hole sizes matching your chosen fittings (typically 3–3.75 inches for PVC elbows). Use a hole saw for smooth cuts, then deburr all edges thoroughly. Additionally, consider that feeding cornmeal in moderation can be a helpful supplement to your chickens’ diet, especially during colder weather. A well-designed feeder can help maintain hygiene and nutrition by minimizing waste and providing easy access to food for your flock. It’s also important to remember that a high-protein diet during the chick stage is essential for healthy growth, as a balanced diet containing around 22% protein is crucial for their rapid development. Furthermore, feeding laying mash to your hens can significantly boost their egg production and improve eggshell quality.
Next, test-fit outlets before applying food-safe silicone or PVC cement. Verify gaskets sit flush and screw fittings are evenly torqued. Position outlet lips 3/4–1.5 inches above the container bottom for ideal chicken feed flow. A food-grade bucket prevents contamination and keeps feed fresh throughout the feeding season. Allow adhesives to cure fully—typically 24 hours—before filling your DIY projects with feed.
Optimizing Feed Window Height
Once your outlets are cured and tested, you’ll need to set the feed window height to match your flock’s physical characteristics and age. Position the feeder 100-150 mm above the floor, aligning the lip at two-thirds to three-quarters of your bird’s wing height. This measurement prevents scratching, spillage, and contamination while reducing disease spread.
Account for flock dynamics by mounting feeders at the smallest breed’s back level, deterring dominance issues. As your birds mature, raise the feeder incrementally—approximately 1-2 cm per growth stage—across six levels to your target market weight. This systematic approach minimizes overeating and maintains uniform feed access throughout your flock’s development, optimizing both performance and feed efficiency. Regular monitoring of feeder positioning ensures the feed window height continues to match your birds’ changing needs as they progress through different lifecycle stages.
Why This Design Reduces Rat Problems
Your DIY chicken feeder‘s enclosed hopper and controlled dispensing mechanism work together to eliminate the primary attractant that draws rats to poultry operations: accessible spilled grain. By restricting feeder accessibility through small, drilled openings, you minimize ground scatter and reduce the carrying capacity that sustains rodent populations. The elevated design combined with sealed seams creates physical barriers against gnawing and climbing, functioning as effective rodent deterrents. Moreover, chickens that are properly cared for can thrive with the right social interaction levels, which helps bolster their overall health. It’s crucial to use bedding materials that do not pose risks, as some options like pine shavings can lead to health issues in chickens. Additionally, feeding your chickens properly cooked beans can contribute to their nutrition while ensuring their safety, as toxic raw beans can harm poultry. You can further strengthen this system by removing feeders overnight, denying nocturnal rats continuous food access and discouraging den establishment near your coop. When paired with habitat modifications—trimmed vegetation, sealed bulk storage, and closed waterers—your feeder design interrupts the steady food source rats require for reproduction, creating a thorough defense against infestation. Storing feed bags in galvanized steel bins prevents rodents from accessing bulk grain supplies that would otherwise sustain larger populations around your property.
Long-Term Benefits and Time Savings
As you implement a precision-engineered DIY chicken feeder, you’ll notice immediate gains in operational efficiency that compound over time. You’ll spend 50% less time managing daily chores because gravity-fed systems eliminate constant refilling and cleanup tasks. Your flock experiences measurable health benefits from consistent, contamination-free feed access, resulting in higher egg yields and reduced disease risk. Nourishing chickens with safe and nutritious grub worms can be an additional benefit, enhancing their diet and supporting robust health. Additionally, maintaining a stress-free environment can help reduce aggressive pecking behavior, promoting harmony within the flock. Controlled feeding ports minimize waste by up to 30%, directly lowering your feed expenses. High-capacity designs hold feed for three weeks, dramatically reducing refill frequency. The terracotta wick system preserves nutrient integrity, while angled ports prevent feather contamination. This consistent feed management also reduces reliance on commercial products, supporting your transition to more sustainable living practices. The implementation of gravity-fed systems ensures that feed flows smoothly, further enhancing the efficiency. Implementing an automatic feeder system can further enhance feed efficiency, significantly benefiting both your wallet and the wellbeing of your flock. Over months and years, these systematic improvements translate to substantial cost savings and decreased reliance on commercial products. You’ve effectively optimized your operation through thoughtful engineering.